Wednesday, May 1, 2013

Restoring a 1920s Beaded Dress - Part 2

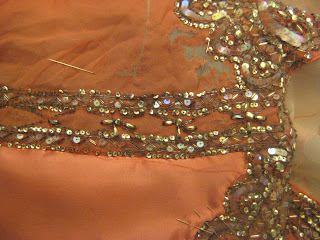
Finally, the dress is supported by the underlying georgette and can be hung up -- just long enough to take a photo.  On the right is the inside view - most of the dress underlined with polyester georgette hand stitched in place. 

Fortunately, two days before the San Francisco Art Deco Society Preservation Ball, I went to Britex Fabrics in San Francisco and found some silk habutai in a very similar color that I used to cover the holes in the dress. 
I cut the silk habutai to size and carefully stitched it to the front and back bodice along the beaded areas.

One day and many tiny hand stitches to go!
 

Saturday, April 27, 2013 
The Art Deco Preservation Ball at the Paramount Theater in Oakland, California!
My restored dress even hits the dance floor!
TA-DA!


Restoring a 1920s Beaded Dress - Part 1


My professor gave me a surprise gift!!  A plastic bag - inside I could make out sparkles from sequins and beads and scraps of persimmon colored silk georgette.  She told me it was a 1920s dress that her mother bought at a yard sale long ago.  It was made in France and totally stitched by hand.

Too fragile to wear or even hold up; the silk fabric would fall apart from the weight of the beads.  I managed to carefully lay it out on a flat surface to take a photo.
The San Francisco Art Deco Gala was just a few months away - April 27, 2013 at the Paramount Theater in Oakland.  I was motivated to restore this beautiful dress to wear to the event.  I accepted the challenge to make the dress wearable again - if just for one night.

1.  Step One in the restoration
I needed to stabilize the fragile silk georgette that was shredding in front of my eyes.  Chemical reactions taking place in the silk over time caused by the dyes and iron-based mordants used in them are often responsible for deterioration of the fiber.  I purchased a light weight polyester georgette to use as a backing to the silk.  I started with the area that was most damaged -- the back.

2.  Thousands of hand stitches - I started by cutting a piece of the reinforcement georgette to the size of the back.  I hand stitched along the edges of the neck, armhole and shredded areas.
3. Then stitched in the beaded area to give more support and to reduce weight on the silk.  I reinforced each section on the dress with the georgette and my fine hand stitching.  I worked on the process over a period of several weeks with the dress spread flat on a table.  A cardboard box lid inserted inside the dress enabled me to make sure my stitched only went through one layer of the dress.


4.  Finally, after hundreds of stitches and hours, I was able to hang the dress up and believe that my goal of wearing it to the gala might be achieved.  See Restoring a 1920s Beaded Dress - Part 2

Thursday, January 10, 2013

How to make bound buttonholes

Mark the Center Front and the buttonholes
This is an easy method!

1.  When you start a new sewing project, make the button holes first.  It is easier to make the buttonholes on the individual piece instead of the finished garment.
2.  It is important to use a light weight interfacing on the garment piece that will have buttonholes.
3.  Carefully mark the Center Front and the buttonholes on the wrong side of the fabric.
     I use a sharp pencil and parallel ruler to make sure the buttonholes are perpendicular to the center front. 
4.  Cut bias squares of fabric to create the lips of the buttonholes.  Place this pieces on the right side of the fabric centered over the buttonholes that you have marked.

The bias square of self fabric measures 2" by 2"


5.  Now you need to sew the "box" for the buttonholes.  You should use a slightly smaller stitch size.  Sew slowly and carefully to create a even box.  I often turn the wheel by hand at the corners to get perfect 90 degree angles at the corners.  T counted three stitches on the short sides of the buttonholes so that they will all be the same.
6.  Using very sharp scissors (so that you can cut into the corners but not cut the stitches that you have just sewn) cut open the rectangles but cutting the center of the buttonhole.  Stop about 1/4" from each end.
Cut center of buttonhole open
7.  Then cut carefully into each corner of the buttonhole.  Be especially careful to not cut the sewing thread.
Cut into each corner.  Don't cut the stitching thread!


8.  Turn the bias pieces that you have sewn on the right side of the buttonholes inside to the wrong side.

9.  Open up the bias piece of fabric on the wrong side and press the seam allowances of the button holes away from the buttonhole. 

10.  Next, carefully stitch the seam allowance on the narrow sides of the buttonholes to the bias piece of fabric.  Be very careful that you don't sew it to the garment itself.  I often make this mistake so look carefully at the photo so this step is completed correctly.  This step makes the shorter sides of the finished buttonhole look neat and finished.
Note that you need to sew the seam allowance to the bias piece and not to the garment. 


11.  Now add the cord to the lips to make corded bound buttonholes.  Place the cord between the stitching line of the long side of the buttonholes and the bias piece.  Roll the bias back over the cord to create the lip.  Carefully pin in place so the width of the lips is even.  Stitch by hand in the seam so that the stitch is hidden.  This stitching technique is called "stitch in the ditch".
Place the cord next to the stitching line.
Wrong side view of cording pinned in place.
Pin the lips in place on right side being careful to keep lips even in width.
Hand stitch the lips: "stitch in the ditch" to hide the stitch
12.  Tack the lips closed and then carefully press.
Tack the buttonhole closed for pressing.
Next step will be finishing the back of the buttonholes!

How to determine the correct size of a buttonhole

I am going to post instructions for making bound buttonholes.  First you need to determine the correct size for the buttonhole that you will be making. 

Do this by taking the button you have chosen and fold your fabric around the button.  Place a pin in the fabric and then remove the button.  Measure from the pin to the fold of the fabric. 

This is the size of the buttonhole that you need to make for that specific button and your chosen fabric.  The correct size buttonhole in the photo above is 3/4".

Wednesday, December 26, 2012

Vintage Vogue Pattern 1998

Vogue 1998 - front view
 My mother sewed the jacket of this Vogue pattern for me when I was in high school.  I still have the pattern and the jacket!

She made it in a sewing class taught by a woman who had worked in the couture department of I. Magnin in San Francisco during the 1950s and 60s.  She taught us couture techniques she had used at I. Magnin replicating garments purchased in France.  Copying French Haute Couture garments was a common practice in the 1950s.  The Couture houses sold the patterns or muslin toiles to the department stores that sent their buyers to Paris to view the fashion shows.  The store might purchase a designer original as well as the pattern and make garments they could retail for less.

Some of the features of couture sewing techniques we learned are:
1. Bound button holes
2. Hand stitched linings
3. Hand set zippers
Vogue 1998 - back view
4. Horse hair canvas used for interfacing

5. Hand feather stitching on the interfacing
6. Finished interior seams
7. Top stitching with silk button hole twist
8. Underlining and lining for most garments

Bound buttonhole at sleeve cuff
My mother used most of these techniques making this jacket.

The jacket still looks good on the outside!
 Maybe that is why the jacket still looks very good after all these years! One thing that does not look good - the lining!  Lining fabrics are often made out of acetate.  Acetate linings in vintage garments often change color over time - becoming a strange reddish or purple tome.  This is caused by gas fading or fume fading, as result of exposure to atmospheric gases or gas heat. Acetate is a weak fiber and has poor abrasion resistance which results in the lining wearing out before the outer fabric.  Since I still have the original pattern, making a new lining and setting it into the garment by hand will be an easy project!                                             

I wore it recently with a printed charmeuse stock-tie blouse that I designed in the late 1980s. 

Monday, October 26, 2009

Out on the town in my new dress


Here I am in my dress at an opening at the Lyle Gallery on Town Street in Columbus.
I love it!

Thursday, September 17, 2009

FINISHED DRESS


Here is my dress finished. I love the way the prints work together!


I am looking forward to seeing all of you in class and helping you to create your own dress or tunic.


Thanks,

Nan Turner